This shop has been compensated by Collective Bias, Inc. and it’s advertiser. All opinions are mine alone. #RethinkYourColour #CollectiveBias

Summer is coming, and that can only mean one thing: Being too poor to actually go to the beach every day, so you just make your hair look beachy and tousled so your outlook is sunny. At least, that’s what it means for me. I’ve had the perfect combination and steps down pat for the last 4 years to make the PERFECT beachy waves, so now I’m ready to share my secrets with you.
How to Get the Perfect Beachy Waves
Step 1: Wash your hair with your favorite shampoo. As predicted, mine is the John Frieda Brilliant Brunette® Visibly Brighter™ Subtle Lightening Shampoo, which I shared with you as a new product I was interested in a few weeks ago!
Step 2: Separate your hair into layers, starting with the bottom and moving up. It’s important to get some bend and movement in the bottom-most layers, but they don’t need to be perfectly done. Spend more time on the top few layers.
Step 3: Pick ~1″ pieces of hair (again, not perfect- messy is perfectly fine.) You will wrap this strand around the barrel of the wand AWAY from your face. Hold the hair on the wand for 10-15 seconds, depending on how thick your section is or how thin/coarse your hair is. Continue to do this and in your 1-2 inch sections around your head, layer by layer.
Step 4: Spray your hair with a hair spray, like John Frieda Luxurious Volume™ Forever Full™ Hairspray, to give some hold and texture.
Step 5: Once your hair is completely dry, you can use your fingers to separate the curls and rough your hair up a bit to give that great beachy look.

Step 6: Go back in for touch ups. If it’s too curly, go over with a warm flat iron. If some curls have fallen, you can go back in with your curling wand to add curl where it’s needed.
My favorite thing about this hairstyle is that it wears for days after you are done with it. The next day hair is a softer wavy look, and you can either add in more curls, or just go as-is. I’m always getting compliments on it, and it’s so easy that once you get the hang of it, you will be a styling PRO! You can watch me create this hairstyle in my video below.

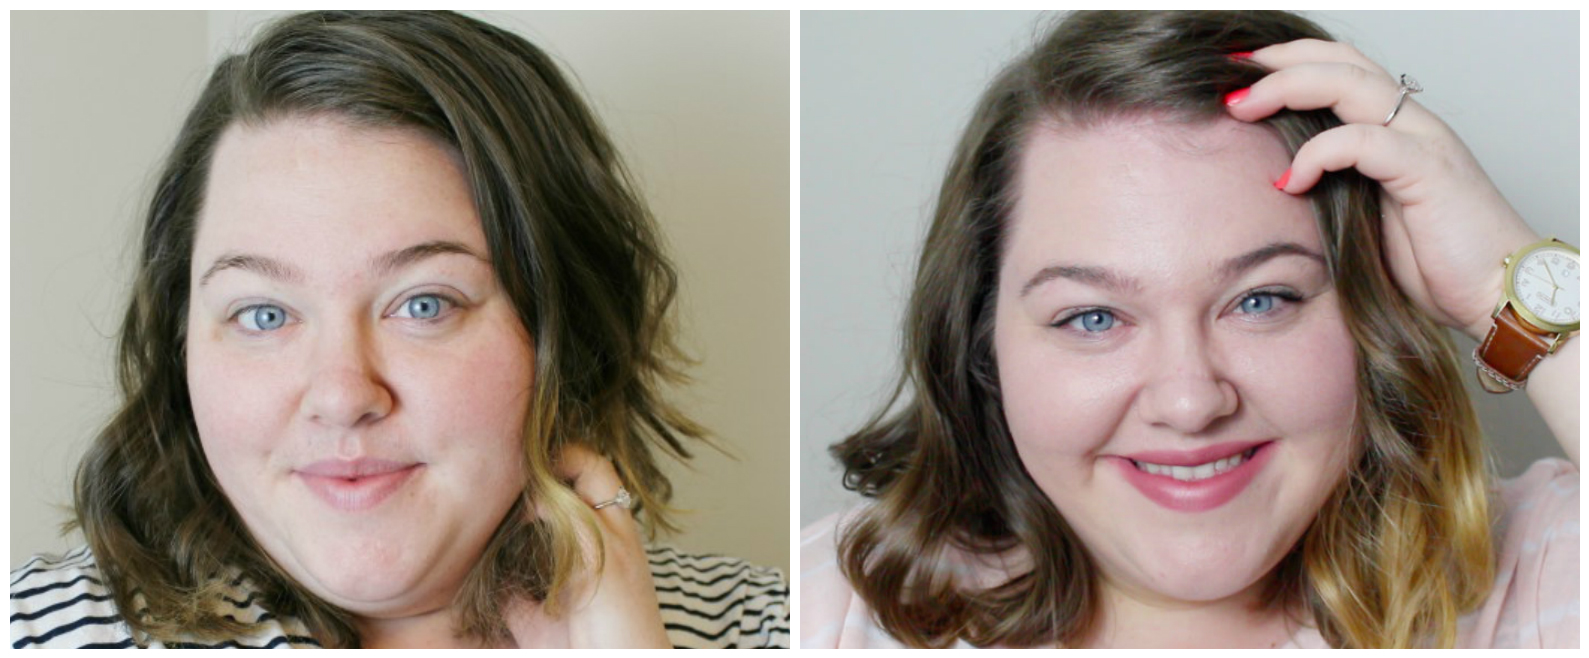
Now, the update you’ve been waiting on! I let you know a few weeks ago when I introduced the Brilliant Brunette® Visibly Brighter™ Subtle Lightening Shampoo, Brilliant Brunette® Visibly Brighter™ Subtle Lightening Conditioner, and Brilliant Brunette® Visibly Brighter™ In-Shower Treatment that I was going to give you an update. The result is that I definitely have MUCH brighter hair. The bits at the bottom of my hair that were already lighter have become basically blonde, and my regularly acorn-colored hair has turned into a beautiful honey blonde/brunette shade. I’m impressed at the results and the fact that my hair can change like this, but still feel so healthy!
Check out the before and after below! If you want to try the Brilliant Brunette line, remember, you can pick them up at Walmart or Walmart.com, if you can’t find them in store.


